Search

Tuesday, October 27, 2020

Saddle Number 2

Yesterday a lady messaged me on Etsy and asked if I could make her two saddle sets for Christmas. I worked out the details with her and I got crafting. The secret to creating a good saddle tree is to use a soda can. A soda can is thin metal and you can easily bend it into the shape of a saddle tree. I'll probably do a tutorial on making saddles... someday.... 


Since I got new leather it was so much easier to cut out the shapes that I needed. The hardest part about cutting out leather pieces is getting the edges straight. 


Here is the finished saddle! All I need to do now is attach stirrups and make a girth. I'll leave that for tomorrow. Right now I'm too tired.


Benji, lounging in the sun.

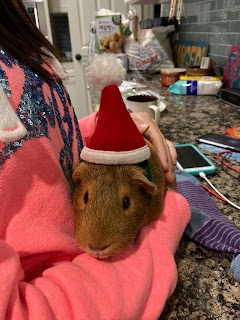
Cindy, trying on her new Santa hat I made for her.


Wednesday, October 21, 2020

Scrap Boots

        Almost every tack maker has some sort of scrap box. Mine is this box of random leather scraps that I hopefully will use someday. I mostly keep it because leather is EXPENSIVE and I don't want to waste any piece of it. Today I noticed that my scrap box was getting quite full so I wanted to make something out it.


Today I made some " scrap boots". I dug out my boots pattern from my pattern bag and I got to work.


First I cut out the shape and then added stitch marks along the edge. Using the pounce wheel on super thin leather is hard! the leather kept on twisting and moving so my stitches came out a bit crooked. I tried again, and it was a bit better. 


Now I made the cup shapes and added leather lace ( also from my scrap box).


The only thing that was not a scrap was the buckles.


 Here it is on Protocol:


* Sigh * Don't you just hate it when you now have to make a second boot look exactly the same? Well that took me another hour fiddling, to make it the same size, and look.


Now the scrap boots are proudly strapped onto Protocol. Get it? The Strapless mold? 
Ha Ha Ha!


Sunday, October 18, 2020

I Joined the Collector Club

     I know it's really late ( 8: 30 P.M. ) but I wanted to do a quick post. As of a few minutes ago I joined the collectors club! I have been wanting to join for a while but I had to wait for the 2021 registration to open. My mom bought the membership for me so, thanks Mom!😃👍 I am SO exited right now, I can't wait to read the forum and learn more about model horses! 


Ps: You might know I am just starting to make model horse tack. I know that my tack is not perfect, so I would LOVE some pointers on how to improve! I also REALLY want to start photo showing or performance showing so some advice would really be helpful. 

Thank you so much for reading this super short post!


Thursday, October 15, 2020

Donut Bareback pad

 Today I wanted to try and sew something new so I made a bareback pad! This was my first one and it took MANY tries. Well at least I had something to do for an hour! First I made a basic pattern and traced it on a piece of black fabric. 


Next I cut out a piece of thin batting. This batting is really thin so I use it in my saddle pads.


Then I sewed around the shape and cut it out.


After I sewed it around I then flipped it inside out. This was the hardest part for me because I kept on ripping it or I made the pattern too small.


Too small!😂


This is how the bareback pad looks now. I added the donut fabric and a ribbon to use as the girth.


Here it is on a horse:


I think that I will continue sewing different pads until I get the perfect one. Well at least now I can check bareback pad off the list! ✓


Wednesday, October 14, 2020

Cowboy

As you may know I ride horses every week. I usually ride Peaches but a few days ago I rode Cowboy for the first time. I mostly got him because I wanted to ride a different horse. To my surprise Cowboy was very patient and just stood there while I groomed, and tacked him up. The bridle took a bit of coaxing but I eventually got it on!


I started riding horses in the summer, so I only know how to walk and trot but I will learn how to canter and jump soon. 


I LOVE riding horses because it's so much fun to go fast! It also feels great to be sitting on the back of such an awesome animal.( I'm sure your a horse lover like me.🐴)


Monday, October 12, 2020

Bridle Update

    Today I made to bridles with the lace that I dyed. This was my first time attempting to create a figure eight bridle. It came out really nice! It was a challenge with all of the tiny buckles but I eventually got it on the model horse. 

This is a simple snaffle bridle that I made. 


On the snaffle bridle I added a raised browband. It took many tries but I eventually got it to look fairly good.


A while ago on Rio Rondo I saw that they sold D- rings. I of course needed some, so I added it to my list. I should have read the sizes more carefully because they were WAY bigger than I expected. Well I had an awesome idea, I can use them as bits! So now I'm glad that I have giant ( but not so giant) D- rings.


Now I just have to add some reins to my bridles. 😋


Sunday, October 11, 2020

Tutorial: Dying Leather Lace

     Hello! Today I will be showing you how I dye my leather lace. You can buy pre dyed lace but the colors don't always match up with your dye. So I like to color the lace myself. I bought this leather lace from Leather Cord U.S.A.


First you will want to cut long strips of lace. I like to dye a lot at once so that I don't have to do it again.


Next you will want to find someplace to dye it. Using dye can get really messy so I do it over my basements sink although you can do it over anything you don't mind getting dirty. As you can see my dad also uses this sink for cleaning his paint brushes so a few spills of black/brown dye is okay.


I will be using this Fiebings's dark brown color. I also have a black but today I wanted to make a few brown bridles.


To apply the dye I use a paper towel. I have used wool daubers but when dying lace it is much easier with a rag or paper towel.


I fold the paper towel in half...


...and dip it in the dye bottle!


Now you can fold it over the lace and just pull it through! This creates a nice, even color super fast. I usually do multiple coats depending on how dark I want it to be. 


This is how the color turned out when I was done. 


Now I have to let the leather dry. It usually dries pretty fast but you want it to be completely dry before using it.


Optional: I add many layers of Super Shene on my leather to make it look extra shiny. I put it on the same way that I put on the dye.


Once you've finished with that your leather lace is ready for crafting!


Lily and Cindy eating kale.


Friday, October 9, 2020

Gerbil Photos

     Today I thought that you would like to see some more photos of Latte and Mocha.


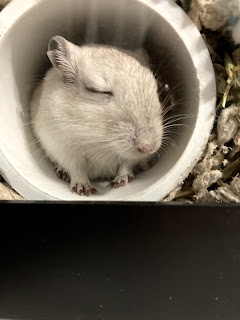
Latte sleeping in the tube.


We got the gerbils a new tank! This is now a 15 gallon, and they love it!


While I was taking photos of Latte, Mocha gave me a lovely view of her... behind...


Mario coming out of the tube, BEEP, BEEP.


Bye!!!